First, determine what picture you want your staircase to look like from our website. You can look at the photo gallery or any place on the Stair Warehouse Website.
Once you have found this picture, you should see the list of products represented in that picture. If, for whatever reason, the products are not listed, contact us for a full list.
If you are interested in Iron Balusters only, look at the pattern on the picture you have chosen and count how many balusters are in the pattern. Second, determine how many balusters you need.
Code requires that you may not have balusters or spindles installed any further than 4 inches apart. So, what we do here at Stair Warehouse is add up the total number of inches per section of handrail required and divide that number by 4. This will give you the total number of balusters that you require. Now, if you are retrofitting your balusters by taking out the old, dated white spindles and replacing them with iron, you can use the existing holes.
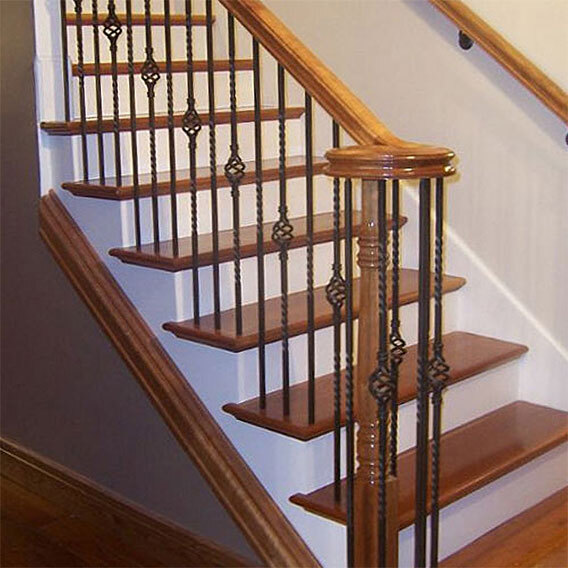
You can see two different balusters installed in an alternating pattern — the Single Basket Baluster and the Hollow Single Twist, both in Hollow Satin Black.
If you need a total of 120 balusters, simply divide that number by two — meaning you'll need 60 of each style.

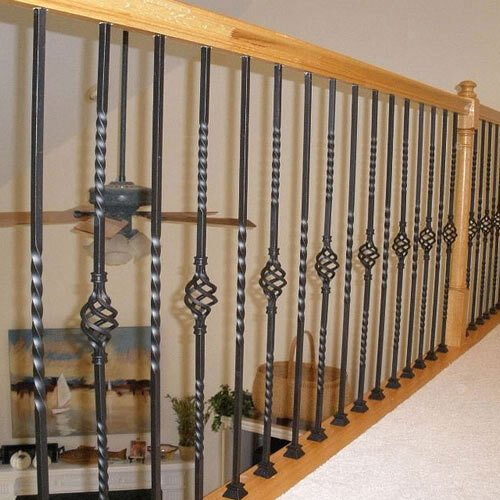
In this Picture, you will see a different pattern that requires a different Calculation: You have a Tuscan single sphere, a Scroll, then a Tuscan double Sphere on the right side. In this example, you would take the number of balusters you need and divide it by the number of balusters in your pattern. For example, if you require 120 balusters and have one Tuscan Hammered Single Sphere, one Italian Small Heavy S Scroll and one Tuscan Hammered Double Sphere in your patter, you would divide 120 by 3. That number comes out to be 40. So you will need 40 of each style of the iron baluster. You can see in the picture that the left side is not exactly like the staircase’s right side. And that you would need an extra Single Sphere. This is okay as long as you keep the same iron balusters in the pattern. There is no hard-fast rule, and we have seen it all.
The final step is to determine how many shoes you need. Most people put shoes on the top and the bottom. These shoes act like a trim piece, similar to baseboards and crown molding in a home. It would be best if you determined how many flat shoes, the size of the shoe, the size of the baluster, and how many angled shoes. We also have Zip Clip shoes that work great and cuts your installation time in half. Also, remember that you will need Epoxy for each hole drilled. One tube per 25 iron balusters for our epoxy. You can find additional information on the following link as well as helpful Installation Tips:
If you are interested in one specific product, click on the link and search your category: https://www.stairwarehouse.com/
Most of our products are in stock, but you should be able to find an estimated ship date before checkout.
If you want to completely re-do your existing staircase, go back to the picture you like from our website and follow these 10 simple steps:
Let’s take this Modern Stair Railing picture and explain all the steps to Recreate it. This Railing is one of our most popular systems, and all the products required are listed here: https://www.stairwarehouse.com/modern-stair-railing.html
Step 1
Count how many Newel Posts you have in your existing railing.
Step 2
When using the Modern Railing System, you will need to make sure that your Newel Posts are no further apart than 5 feet.
Step 3
Write down the number of Newel Posts Required. Also, our 48” newel posts are standard and work for just about any application.
Step 4
Determine what type of Wood Species you want. Hard Maple is the Wood you see in the picture. All of our wood is un-finished and Ready to be installed, stained, and or varnished.
Step 5
In this picture, the Newel Posts are the following: 3-1/2” Contemporary Newel Post
Step 6
Determine how you want to secure the Newel Post to the floor. In the picture, we used the following: 3005 Key Lock - Newel Post Fastener
Step 7
Determine how many handrails you need. You can measure the amount of handrail you need and apply it to this picture. Always round up to the foot to make sure you have enough. If you are close, buy an extra foot to be safe. In this picture, the handrail sits on top of the newel posts, so you will need longer handrail lengths to accommodate the staircase railing. The handrail in the picture is made of Hard Maple: 6002 Contemporary Handrail - No Plow
Step 8
Count how many Newel Posts you purchased and Order One of the following to install at the top of the posts for the handrail to sit on. Satin Black is what you see in the picture Round Bar Handrail Stem
Step 9
Determine how many horizontal round bars you require. In the picture, there are 10 Horizontal Round Bars between each Newel post. Each Round bar is 8 feet long and can be cut to fit. You will need to think about this a little and decide whether or not you want 10 round bars or less. The horizontal round bars only come in 8-foot sections, so there may be some waste. Powder-coated Satin Black color is represented in this picture: Horizontal Round Bar - Hollow
“You Will also need a strong adhesive where you drills the holes for the horizontal Round Bars and the handrail Stems. We recommend the following epoxy, but it is certainly not required. Each tube of epoxy will install 50 holes drilled.”
Step 10
Determine whether you need a landing tread for the Newel Posts to sit on. In this picture, the customer used our 5-1/2” Hard Maple landing tread to smooth the transition to the wood flooring.
Most People use a Trim Carpenter, handyman, or flooring installer as they are usually already working with one before their stair project begins. But if you want to do it yourself, the following video shows how easy it is to Install. One of our customers was kind enough to shoot a video of her and her husband Installing our Modern Stair Railing Kit. Their staircase looks gorgeous now, and they are so pleased with the result. Please take a look at her How-To Video.